Stable diffusion XL is Stability AI’s latest AI image generator released in July 2023, it gives a significant improvement to image quality compared to prior versions at a modest performance cost, a number of popular frontends have at least partial support for SDXL which should improve over time.
In this tutorial I’m going to assume that you have no prior knowledge, the frontend I’m using is Comfy UI, while it does have a steeper learning curve it offers the best performance and least issues of currently available frontends.
Installation
Windows users with Nvidia hardware or those wanting to use CPU only can download the portable version, you only need to exact this somewhere and run the desired batch file.
For users of AMD hardware, Linux or OSX, you will need to perform a manual install which is described here, you will need Python 3.10.x* installed or alternatively you can use an Anaconda environment which is outside the scope of this tutorial, you’ll also need git installed to clone the repository.
- When installing Python on Windows make sure the option add to PATH is checked.
Open your command prompt / terminal and browse to where you want Comfy UI installed, a minimum of around 20GB of free space is required but more is recommended.
git clone https://github.com/comfyanonymous/ComfyUI.git
cd ComfyUI
Next create a virtual environment so it doesn’t interfere with other Python software you have installed, if you don’t care about this you can skip straight to installing.
python -m venv venv
.\venv\scripts\activate
# Linux users use: source venv/bin/activate
Run the following commands depending on your hardware and operating system:
# Nvidia (all)*
pip install torch==2.1.0 torchvision torchaudio --index-url https://download.pytorch.org/whl/cu121
pip install -U xformers==0.0.22.post4

# AMD (Linux / ROCm)
pip install torch torchvision torchaudio --extra-index-url https://download.pytorch.org/whl/rocm5.4.2

# AMD 7000 series (Linux / ROCm)
pip install --pre torch torchvision torchaudio --index-url https://download.pytorch.org/whl/nightly/rocm5.7

# AMD (Windows / DirectML)
# This must be run after installing from requirements.txt
pip uninstall torch
pip install torch-directml

# If you get the error "Torch not compiled with CUDA enabled" run this and repeat
pip uninstall torch- SDXL may have serious issues with DirectML, more than 8GB of VRAM or having AMD Smart Access Memory may be required to avoid crashing.
- Torch version is fixed at 2.1.0 for users using precompiled xformers 0.0.22.post4, if you’re not using xformers this is not needed.
- xformers typically reduces vram usage and increase speed, however you may find you get similar or better results by using the –use-pytorch-cross-attention launch option, particularly with newer versions of pytorch so feel free to experiment
Then you just need to install the rest of the dependencies.
pip install -r requirements.txt
To make things a bit easier to launch I recommend making a simple launcher script, a very basic example PowerShell script which includes automatic update would be:
git pull
.\venv\scripts\activate
python main.py --auto-launch

# Use one of the below instead only if needed
# For Linux AMD 6000 series users you may need to use this
HSA_OVERRIDE_GFX_VERSION=10.3.0 python main.py --auto-launch

# For Linux AMD 7000 series users you may need to use this
HSA_OVERRIDE_GFX_VERSION=11.0.0 python main.py --auto-launch

# For AMD Windows DirectML users
python main.py --auto-launch --directml
Save it as a .ps1 file in the same location as main.py, right click it and click Run with PowerShell to launch Comfy UI, if all is working you can download the SDXL models, you will need the base model and the refiner model, put them both in ‘ComfyUI/models/checkpoints’ and restart Comfy UI.
Enable High Quality Previews
To enable high quality previews download the taesdxl_decoder.pth and place it in ‘ComfyUI/models/vae_approx’, then add –preview-method auto to the launch script.
Basic Images
To start you can copy the below workflow or load one from the examples provided.
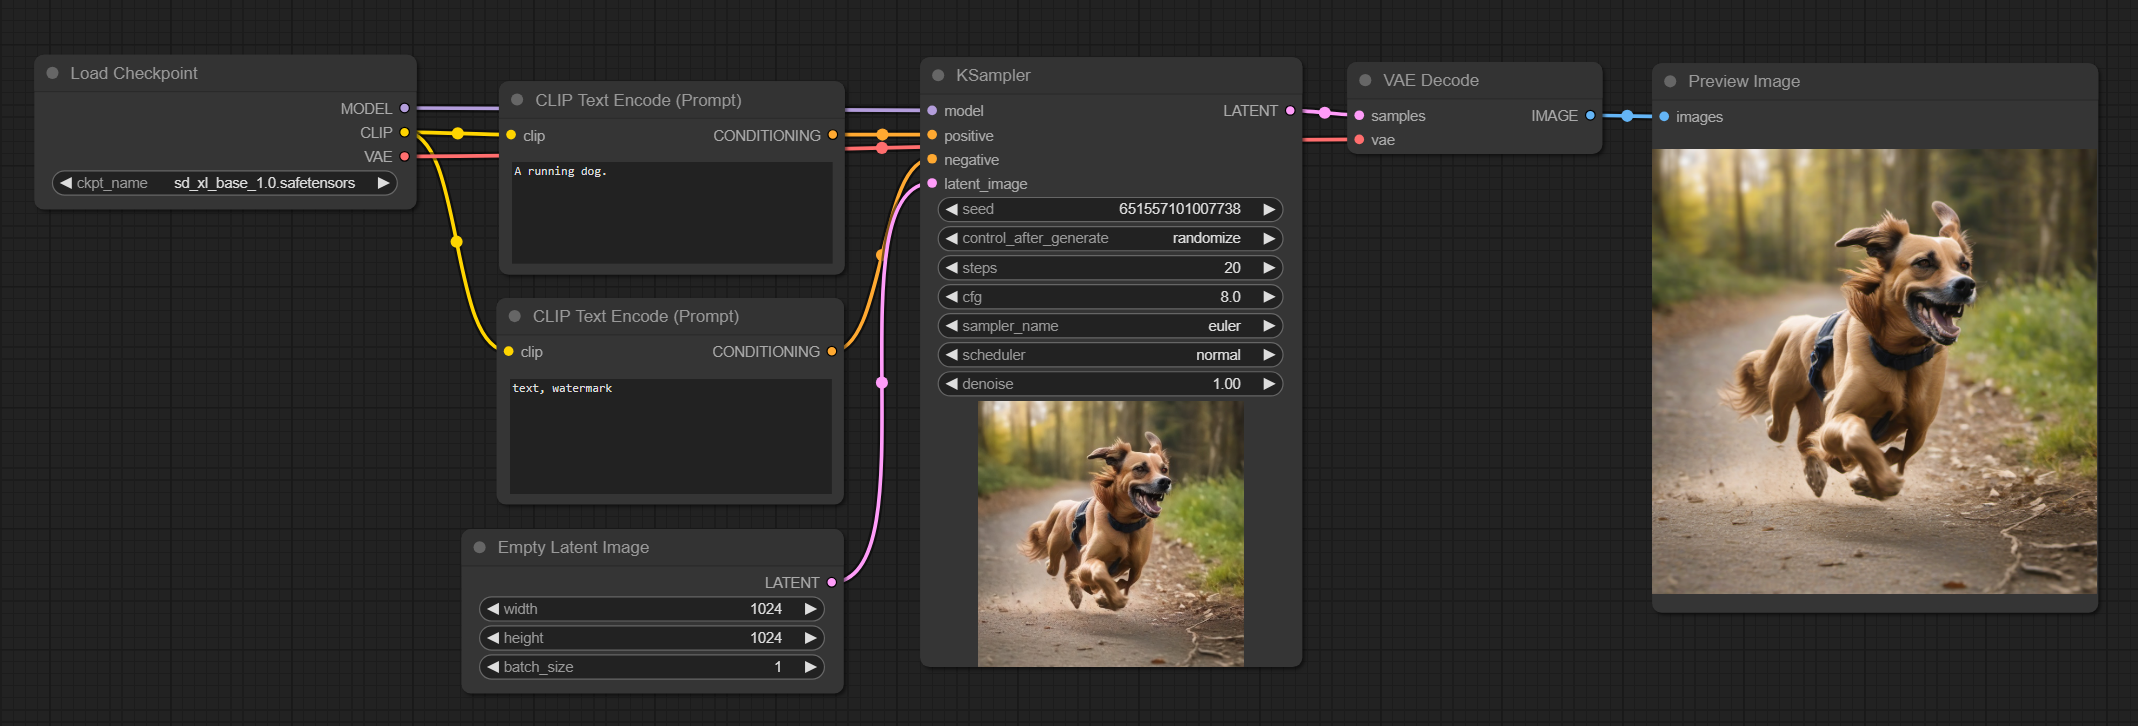
This is the most basic workflow you can get, the positive and negative text prompts are encoded by the CLIP Text Encode node which gets given to the KSampler which produces the latent image, the size is set by the Empty Latent Image, finally the latent output is decoded by the VAE Decode giving the actual image.
By making a few changes we can add the refiner model to the workflow, this is intended to be used after the base model and helps produce additional details, you can give it the same or a different prompt to get interesting results, using the same seed as the base may be preferable in most cases:
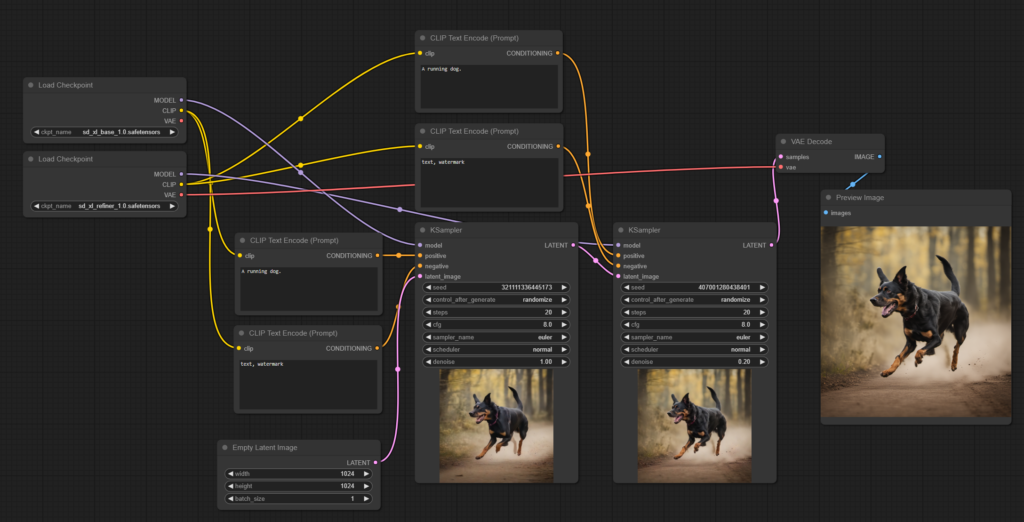
As you can see we’ve pretty much duplicated everything here, except the denoise parameter in the refiner sampler has been reduce to 0.2, denoise controls how strongly the sampler effects the latent image, ranging from 0 to 1 (0% to 100%), since we want the refiner to refine the image, not completely replace it a value of 0.05 to 0.4 is a good choice.
Another important parameter is the steps, simply put the more steps you have the more refined the image will appear, however there is a point of diminishing returns where the image changes very little or not at all with additional steps, the optimal amount varies with the sampler used, the image subject and various other hard to predict factors, typically 20-30 steps is decent for a preview with 100-400 for a final image, you may find at times that lower steps produces a more desirable image.
There are a number of samplers to choose from although I would say there are only a few that are really worthwhile in my opinion, Euler is a decent general purpose sampler, DDIM is excellent for faces and DPMPP_2M is overall good for most purposes, as with anything experimenting is a good idea.
The CFG (Classifier Free Guidance) controls how strongly it tries to adhere to the prompt, higher values tend to give results closer to the prompt but can result in weirdness if set too high, a range of 4-15 usually works, a lower value in the refiner seems to be preferable.
Make sure you check out the examples for different workflows, there is multiple ways to do the same thing, the more advanced SDXL workflow given in the examples tends to generate better images than the more traditional method shown here.
This only covers the very basics of what you can do with AI image generation but you can get a lot of interesting results with only this.
Updated 23 Oct 2013: Minor adjustments