• Understanding the Linux Boot System

    Date Posted:

    Background

    If you’ve ever tried to install Linux from scratch or with a distribution such as Arch or Gentoo you would have found the partitioning and boot loader setup to be a rather confusing mess of different standards, compatibility problems and issues, particularly with dual booting, even when using an installer there is still a chance things will not work as intended, additional features such as encryption, secure boot, fast boot and RAID further complicate matters, in this article I will attempt to simplify things somewhat, however I still recommend referring to the Arch and Gentoo wikis for the finer details.

    BIOS and UEFI

    The Basic I/O System (BIOS) is a memory chip on the motherboard that contains the code used to perform initialisation of hardware, provide basic software services and configuration used during the boot process, a lot of this was standardised way back in the 80’s so as you might expect the BIOS is now being phased out in favour of the Unified Extensible Firmware Interface (UEFI), this is a much more modern replacement that was introduced in 2006, as of today all consumer level computers support UEFI.

    UEFI shares a lot of similarity with the BIOS and includes backwards compatibility, it provides a number of new features such as enhanced user configuration, support for modern technologies such as secure boot and the UEFI boot process, any preinstalled system since Windows 8 uses it by default, UEFI comes in 32 bit (known as IA32) and 64 bit variants, the former is somewhat rare so if you have a relatively modern computer it’s almost certainly 64 bit UEFI.

    Partition Table

    The partition table is a data structure that tells software how the drive has been partitioned, the original partition table is called the Master Boot Record (MBR) since it contains the master boot loader along with the partition table, this can register a maximum of four primary partitions which can contain their own boot loader, one of these can be replaced with an extended partition which may contain any number of logical partitions, the first 512 byte sector1 of a drive contains the boot loader (446 bytes) along with the partition table (64 bytes) plus a 2 byte signature, due to the very small size it’s typical for the boot loader to read a partition and execute a larger boot loader, a process known as chain loading.

    Due to the significant limitations with the MBR partition table a new one was introduced around the time of UEFI called GUID Partition Table (GPT), this allows for much larger disks (> 2 TB) as well as up to 128 partitions, it also includes redundancy and error checking with a copy of the GPT being placed at the end of the drive. For backwards compatibility and to avoid damage from software that is not GPT aware a MBR2 is placed in the first sector of the drive.

    Boot Process

    For a BIOS system after completing the Power On Self Test (POST) which checks and initialises the hardware, it looks for a disk with a valid MBR, this is then executed, BIOS is capable of booting both MBR and GPT.

    BIOS Boot Process

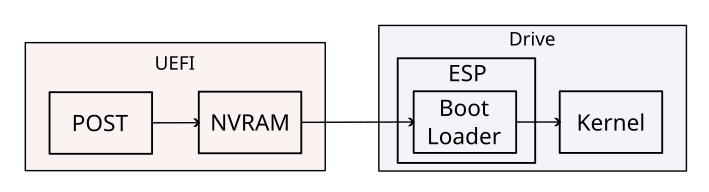
    UEFI provides support for the legacy BIOS boot process using the Compatibility Support Module (CSM) which can be disabled if so desired, UEFI is almost always used with GPT, after the POST stage UEFI looks in its own Non-Volatile Random Access Memory (NVRAM) which contains the boot entries that tell it where to find boot loaders along with other EFI variables and applications.

    Unlike BIOS it can read some partitions directly, boot loaders and other UEFI applications are stored in the EFI System Partition (ESP) which is normally a FAT32 partition of at least 100 MiB, only one of these is allowed per drive, boot loaders are stored as normal files, for example the Windows boot loader is /EFI/Microsoft/Boot/bootmgfw.efi, for removable drives that don’t have an entry in the NVRAM the boot loader is stored at /EFI/Boot/bootx64.efi (bootia32.efi for 32 bit).

    UEFI Boot Process3

    Once the boot loader is executed things proceed mostly the same as with BIOS.

    This gives us four possible combinations:

    1. BIOS / MBR
    2. BIOS / GPT
    3. UEFI / MBR
    4. UEFI / GPT

    Option 2 is not recommend if you’re trying to dual boot since Windows never uses this setup, option 3 is not recommended even though it may technically work.

    BIOS/MBR Setup

    This is an example of a simple BIOS / MBR setup with a single root partition:

    Mount PointPartition TypeRecommended Size
    [SWAP]SWAP4 GiB minimum
    /Linux FilesystemRest of drive

    Installing GRUB for example is done with:

    grub-install --target=i386-pc /dev/sdX
    grub-mkconfig -o /boot/grub/grub.cfg

    Where /dev/sdX is the root partition, or /boot partition if a separate one is used.

    BIOS/GPT Setup

    The only real difference here is that GRUB requires a little room at the start of the drive to store part of the boot loader, which would normally be stored in the gap between the MBR and the first partition, since the GPT partition table is bigger we need a dedicated partition for this.

    Mount PointPartition TypeRecommended Size
    BIOS Boot Partition1 MiB
    [SWAP]SWAP4 GiB minimum
    /Linux FilesystemRest of drive

    Installation otherwise remains the same as BIOS/MBR, note that the BIOS boot partition must not be formatted as anything.

    UEFI/GPT Setup

    Mount PointPartition TypeRecommended Size
    /boot or /efiEFI System Partition1 GiB
    [SWAP]SWAP4 GiB minimum
    /Linux FilesystemRest of drive

    The ESP should be formatted as FAT32, where you mount it has a significant impact, mounting it to /boot makes maintenance and updates easier however there is a potential risk that other operating systems may screw with the ESP in a way that breaks your system, mounting it to /efi eliminates this risk and allows for a smaller partition since it only needs to store the boot loader, personally I recommend the former option for the sake of simplicity, besides GRUB you should have efibootmgr and os-prober installed.

    Installation of GRUB is done with:

    grub-install --target=x86_64-efi --efi-directory=esp --bootloader-id=GRUB
    grub-mkconfig -o /boot/grub/grub.cfg

    Replace esp with either /boot or /efi, use i386-efi if you have 32 bit UEFI.

    Alternatively rEFInd may be a better choice of boot loader than GRUB particularly if you want more advanced features, other options include EFISTUB and systemd-stub.

    Note: It may be advisable to install as a removable disk, this provides protection should the EFI variables in NVRAM become damaged or you have to move the drive to another computer and want it to remain bootable, this can be done by adding the removable flag to grub-install.

    Dual Booting with Windows

    Dual booting Windows has many traps for beginners so I don’t generally recommend it, but if you really want to do it you need to understand some limitations based on the Windows version you want to use:

    • Windows 8/8.1 and 10 32 bit only support booting from IA32 UEFI/GPT or BIOS/MBR
    • Windows 8/8.1 and 10 64 bit only support booting from UEFI/GPT or BIOS/MBR
    • Windows 11 supports 64 bit UEFI/GPT only

    To ensure compatibility you should use the same boot method on both Windows and Linux, regardless if they are on different drives or not.

    Generally it’s recommended to install Windows first then Linux but it can be done the other way around, Windows installed in UEFI mode will create an ESP if one doesn’t exist, this is by default too small to mount to /boot so you will have to resize it, or create the partition layout yourself, if possible I would strongly recommend having Windows and Linux on separate drives to make life a bit easier.

    Before you attempt anything read carefully through this wiki page and make sure you have enough time to deal with problems, once you’ve done it a few times it isn’t that difficult.

    Footnotes

    1. 4096 byte sectors are now also sometimes used ↩︎
    2. Referred to as the protective MBR ↩︎
    3. In practice the kernel can be within the ESP if there is sufficient space ↩︎

    Categories:

    ,

  • Guide to Online Privacy & Security

    Date Posted:

    Now days keeping your information private online is becoming more important that ever, multiple governments are attempting to push legislation that will weaken security measures such as encryption, that is a vital part of keeping your information safe, not just the information on your own computer either, this directly effects other organizations that hold personal information about you, such as banks, healthcare, social media and indeed the government itself.

    You may think that government snooping is acceptable if you have nothing to hide but these measures will make it easier for criminals to gain access to your information, they claim this is to protect children or prevent terrorism, but there has never been any good evidence that this actually works, ultimately it’s about governments controlling what their citizens do and think, that is never acceptable.

    Web Browsing

    Your web browser is in many cases the number one weak point in your system, both for malicious software and leaking of information that can uniquely identify and track you, most web browsers fail to provide sufficient protection without additional tweaking or use of extensions, currently the best ones I would recommend are Brave (available for Windows, Linux, Mac, Android and iOS) and LibreWolf (Windows, Linux and Mac), if you are going to use anything else uBlock Origin is a vital extension, browsers definitely to avoid are Google Chrome, Chromium, Microsoft Edge and Opera.

    You should never for any reason allow advertising, not only does this very negatively effect your privacy but it’s also the number one vector for malicious software, it goes without saying but you should always pay close attention whenever entering private information or downloading a file, always double check the URL carefully.

    Passwords

    One thing that many people fail at is proper password security, firstly you should always avoid anything that can be guessed, such as single words, names, dates, locations, etc. A passwords strength depends on its entropy which is determined by length + number of available characters, for this reason it’s always best to have a mix of lower case and upper case characters, numbers and symbols, a minimum good length for this kind of password is 14 characters which will provide more than 90 bits of entropy, using just lower case would require at least 20 characters to reach this entropy.

    Passwords should also never be reused, you need ideally to have a unique one for each and every service you use, of course this will rapidly become impossible to remember so it’s important you use a password manager, this reduces the number of passwords you need to remember to one, the list of passwords is also encrypted, there are a number of password managers to choose from, some of the ones I can recommend are KeePassXC and BitWarden, writing your master password down is acceptable but it should be stored in a secure location such as a safe.

    Should you have trouble remembering a traditional password an alternative method is to use a list of words, these should range from four to twenty words that are not easily guessed, a good example of this would be “Blame Product Mountain Nuisance Danger House 3” with the spaces removed.

    Two Factor Authentication (2FA)

    2FA (a subset of Multi-factor Authentication MFA) is a very useful addition to passwords, it relies on the fact that your authenticator device is separate from the device you are entering the password on (ideally), this means even if your main device is compromised an attacker cannot gain access without having control of the authenticator as well (again ideally), the authenticator can take the form of a smartphone, another computer or specifically designed hardware authenticators.

    Three common methods are currently in use, SMS based authentication, which is least secure and not good for privacy, HOTP (HMAC based One Time Password) and TOTP (Time based One Time Password) which is an extension of HOTP, the latter two rely on a shared secret key between your account and the authenticator, TOTP has the added advantage that the generated code is only valid for a short time period. These are not perfect but if you have the option to do so you should make use them, two good software options for OTP are FreeOTP (Android and iOS) and andOTP (Android).

    Operating Systems

    It’s no secret that Windows is not particularly good for either privacy or security, so one consideration you need to make is whether it’s worth switching to a different operating system, this could be a whole article in itself so I will only say you should seriously consider switching to something like Mac or (better) Linux, this is not without drawbacks, but as Windows continues to grow more invasive the advantages of making the switch become more apparent.

    Encrypted Communication

    Communication software that proves end-to-end encryption is the only sure way to guarantee privacy, there are many options to choose from, not all of them good, currently the only ones I can recommend with any kind of guarantee are Signal (requires a phone), Jami and SimpleX.

    Naturally these depend on convincing others to use them, something easier said than done.

    File Encryption

    The most reliable and secure tool for this by far is GnuPG, this is not exactly user friendly but there are numerous front-ends you can use if needed, this can also perform message encryption and authentication so it’s very useful if you want to send data over an insecure channel such as email, it’s widely used in the free software community.

    For full disk encryption the two main choices are Veracrypt (Windows, Linux, Mac) and LUKS (Linux), keep in mind that many governments have laws that allow them to attempt to force you to hand over your key.

    Social Engineering

    Often the main threat isn’t your software or hardware itself but vulnerability to social engineering, anyone can fall victim to this but with a healthy amount of paranoia you can largely protect yourself from it, primarily you should always be alert for any suspicious behaviour such as encouraging you to visit a specific website, download a specific file, offering you something for free, being able to authenticate a person such as a friend with things like cryptographic keys (GnuPG is excellent for this) can also be a significant help.

    For people you don’t know you should distrust anything they say, this includes the police, in many situations it’s better to not say anything than to interact with persons you cannot trust.

    Conclusion

    Given the way things are going it’s important that you take your privacy and security seriously, while this is often an uphill battle there is no doubt that it’s worth taking the time and effort required.


  • Formatting a SD Card For Steam Deck

    Date Posted:

    MicroSD Card

    It appears that there is a prevalent issue with the Steam Deck corrupting SD cards that can leave them in a unrecoverable condition, this seems to occur mainly on a second formatting rather than the first, so far we’ve not heard anything from Valve about this, but I suspect it’s more likely to be down to the hardware interface rather than a software bug.

    Fortunately until we know more you can format your SD card outside of the Deck easily, to do this you will need a Linux live system, assuming you’re not already using Linux, Ubuntu is a good simple choice for this.

    Once you have the system running you need to insert your SD card, to identify which device it is use the following command in the terminal:

    sudo lsblk

    This will show a list of connected storage devices, you can identify the SD card by the size and normally it will be last in the list, in my case /dev/sdg, partitions if there are any will show as /dev/sdg1, /dev/sdg2 and so on.

    Once you are sure you have identified the SD card correctly, run the following two commands:

    sudo parted --script <device> mklabel gpt mkpart primary 0% 100%
    sudo mkfs.ext4 -m 0 -O casefold -F <partition>

    The first command creates a new blank GPT partition table, and then a new partition using all the space on the device, <device> should be replaces with your device path, I.E /dev/sdg.

    The second command formats the new partition as an EXT4 file system which is what the Deck recommends, <partition> should be replaced with the first partition on your SD card, I.E /dev/sdg1

    You can now remove it a insert it into your Steam Deck.

    Hot Swapping

    Even though Valve have said you can hot-swap SD cards I don’t recommend it, there is no protection against write corruption so you should only remove it when there is no activity or better unmount it in Dolphin first.

    Should you get it to the point where you have problems, run sudo e2fsck -pf <partition> to repair it.

    Update 30 May

    The formatting command used by Valve has changed slightly adding -E nodiscard to mkfs.ext4, this stops it running discard / trim on the SD card, this should speed up formatting, it is still mounted with discard so I don’t think this would effect performance, it may also reduce incidence of bricking.